#powerpoint design tab tutorial
Explore tagged Tumblr posts
Visit Tumblr Blog
Explore Tumblr blogs with no restrictions, modern design and the best experience.
Last Seen Tumblr Blogs


Fun Fact
There are dozens of funny blogs to kill time on Tumblr.
Video
youtube
How to Crop an Image Into a Shape in Microsoft PowerPoint | Step-by-Step...In this PowerPoint tutorial, learn how to crop an image into any shape — such as a circle, triangle, star, or heart — using built-in PowerPoint tools. This is a fast and simple way to make your slides more visually appealing by customizing your images to match your design.🔹 Works in Microsoft PowerPoint 2016, 2019, 2021, and Microsoft 365 🔹 No extra software needed 🔹 Great for students, teachers, professionals, and designersMake your presentations stand out by turning regular images into eye-catching shapes in just a few clicks!Simple Steps 1. Open your project in Microsoft PowerPoint 2. Click on your image to select it. 3. Click on the "Picture Format" tab. 4. On the right side of the ribbon, click on the arrow below "Crop". 5. Place your cursor over "Crop To Shape" and then slide the cursor straight over to the left and choose any of the shapes to crop your image.
0 notes
Text
How To Share My Screen On Zoom
Zoom has become one of the most popular video conferencing platforms for virtual meetings, webinars, online classes, and business presentations. One of its most useful features is screen sharing, which allows you to present documents, slideshows, videos, and other content in real time. Whether you're using Zoom on a desktop or a mobile device, sharing your screen is simple and effective.
In this guide, we'll cover everything you need to know about zoom screen sharing, including step-by-step instructions, tips for seamless presentations, and troubleshooting common issues.
Why Use Screen Sharing on Zoom?
Screen sharing is an essential tool for various scenarios, including:
Presentations & Meetings: Share slides, documents, or reports during business meetings.
Teaching & Training: Educators can display lessons, tutorials, or demonstrations.
Technical Support: IT professionals can troubleshoot issues by viewing another user’s screen.
Collaborative Work: Teams can co-edit documents, review designs, or work on projects together in real-time.
Entertainment & Social Use: Share videos, games, or photos with friends and family.
How to Share Your Screen on Zoom (Desktop)
Step 1: Start or Join a Meeting
Open the Zoom app on your computer.
Click “New Meeting” to start your own meeting or “Join” to enter an existing one.
Step 2: Locate the Screen Share Option
Once inside the meeting, look at the bottom toolbar and click “Share Screen.”
Step 3: Choose What to Share
A window will pop up with different screen-sharing options:
Entire Screen: Shares your entire desktop.
Application Window: Shares only a specific open app (e.g., PowerPoint, Chrome, Word).
Whiteboard: Lets you draw and annotate.
iPhone/iPad via AirPlay or Cable: Share an iOS device screen.
Step 4: Start Sharing
Select your preferred screen-sharing option and click “Share.”
Your screen is now visible to all participants.
Step 5: Stop Sharing
When you're done, click “Stop Share” at the top of your screen.
How to Share Your Screen on Zoom (Android & iPhone)
Step 1: Start or Join a Meeting
Open the Zoom app on your smartphone.
Tap “New Meeting” or “Join” to enter an existing meeting.
Step 2: Access the Share Button
Tap “Share” at the bottom of the screen.
Step 3: Select “Screen”
Choose “Screen” from the sharing options.
A pop-up may appear asking for permission. Tap “Start Now.”
Step 4: Share Content
Navigate through your apps while participants see your screen.
Step 5: Stop Sharing
Return to the Zoom app and tap “Stop Share.”
Advanced Screen Sharing Options
1. Enable Sound Sharing
When sharing a video or music, check “Share Sound” to include audio.
2. Use the Annotation Tool
Draw or highlight areas on the shared screen using Zoom’s annotation feature.
3. Share a Portion of Your Screen
Instead of sharing the whole screen, select “Advanced” > “Portion of Screen” to share only a specific section.
4. Optimize for Video Playback
If sharing a video, check “Optimize for Video Clip” to improve playback quality.
Common Screen Sharing Issues & Solutions
1. Screen Share Not Working?
Ensure you have the latest version of Zoom installed.
Check if screen sharing is enabled in meeting settings.
2. Black Screen When Sharing?
Update your graphics driver.
Disable hardware acceleration in Zoom’s settings.
3. No Sound in Screen Share?
Make sure “Share Sound” is enabled.
Use a stable internet connection.
4. Laggy or Choppy Screen Sharing?
Close unnecessary applications.
Lower video resolution for smoother performance.
Tips for Effective Screen Sharing
Close Unnecessary Tabs & Apps: Avoid distractions and leaks of sensitive information.
Use Dual Monitors: Keep Zoom controls on one screen and shared content on the other.
Check Internet Speed: A stable connection prevents lag.
Mute Notifications: Disable pop-ups to maintain privacy.
Practice Before Meetings: Ensure everything runs smoothly before presenting.
Conclusion
Zoom Share Screen Android is an incredibly powerful tool for communication, collaboration, and presentation. Whether you're hosting a business meeting, teaching an online class, or troubleshooting tech issues, mastering Zoom's screen-sharing features will enhance your virtual experience. By following these step-by-step instructions and troubleshooting tips, you'll be able to share your screen effortlessly and make your presentations more effective.
0 notes
Text
A Guide to Choosing and Creating Engaging PowerPoint Templates for Your Brand
Business PPT Template Design: Q & A Tutorial
1. How are PPT used in business?
PPT, or PowerPoint presentations, are used in business to visually communicate ideas, strategies, and information during meetings or presentations. They help organize content, engage audiences with visuals, and facilitate discussions. PPTs are commonly employed for training sessions, sales pitches, project updates, and corporate communication to make complex information more understandable and memorable.
2. How to make a template in PPT?
To create a template in PowerPoint (PPT), open a new presentation and design your slide master by going to the "View" tab and selecting "Slide Master." Customize the layout, colors, fonts, and backgrounds as desired. Save your template by clicking "File," then "Save As," and choose "PowerPoint Template (*.potx)" as the file type.
3. How do I find templates for PPT?
You can find PowerPoint templates by searching online on websites like Microsoft Office Templates. Additionally, you can explore the built-in templates in PowerPoint itself by opening the program and selecting "New." Many educational and business sites also offer free or paid templates that you can download and customize.
4. How to design a PPT in Canva?
To design a PPT in Canva, sign in or create an account. Select "Presentation" from the templates. Choose a pre-made template or start from scratch. Add slides, customize text, images, and colors using the toolbar. Use drag-and-drop features for easy arrangement. Once finished, download as a PPT or present directly from Canva.
5. How do I insert a PPT template?
To insert a PPT template, open PowerPoint and select "New" from the File menu. Choose "Templates" and browse for your desired template. Click on it and select "Create" to apply it to a new presentation. If you have a template file (.potx), open it directly or use "File" > "Open" to load it.

Visit: VS Website See: VS Portfolio
0 notes
Text
youtube
How To Customize The Slide Size In Microsoft PowerPoint Using The Online Version
This is a video tutorial on how to change the slide in Microsoft PowerPoint. I will be using the Online version of PowerPoint on a desktop PC in this video.
Simple Steps
Open your PowerPoint Presentation in your browser.
Click on the "Design" tab.
On the ribbon click on "Slide Size" and then "Custom Slide Size".
In the dialog box that opens you can choose a custom width and height.
1 note
·
View note
Text
Getting Started with Microsoft Office: Tips for New Users
If you’re new to Microsoft Office, getting started can seem daunting. In this blog, we’ll provide some helpful tips and tricks to help you get up and running with Microsoft Office and start using its powerful tools and features with confidence.
Tip 1: Explore the Ribbon
The Ribbon is the central hub for accessing commands and features in Microsoft Office applications. Take some time to explore the Ribbon and familiarize yourself with the different tabs and commands available. Hover over each command to see a tooltip description, and experiment with different options to see how they work.
Tip 2: Learn Keyboard Shortcuts
Keyboard shortcuts are a great way to perform common tasks quickly and efficiently in Microsoft Office applications. Take some time to learn and memorize keyboard shortcuts for tasks you perform frequently, such as copying and pasting text, formatting cells, and saving documents.
Tip 3: Use Templates to Get Started
Templates are pre-designed documents, spreadsheets, and presentations that can help you get started quickly with Microsoft Office. Whether you need a resume template in Word, a budget template in Excel, or a presentation template in PowerPoint, templates provide a starting point for your work and can save you time and effort.
Tip 4: Take Advantage of Help Resources
Microsoft Office includes built-in help resources, such as tutorials, guides, and online help articles, to assist users in learning how to use the software effectively. If you’re unsure how to perform a specific task or use a particular feature, don’t hesitate to consult the help resources for guidance.
Conclusion
By following these tips and tricks, you can get started with Microsoft Office and start using its powerful tools and features to accomplish your tasks more efficiently.
0 notes
Text
PowerPoint Design Tab Hindi
PowerPoint Design Tab Hindi
PowerPoint Design Tab – Friends हम पिछली Post में PowerPoint के बारे मैं पढ़ चुके हैं जिसमे हमने इसके Introduction के बारे में पढ़ा था और Home Tab, Insert Tab के बारे में भी पढ़ चुके हैं। चूंकि यह हम सभी पढ़ चुके हैं की PowerPoint एक Application Software है जिसका Use हम Presentation बनाने के लिए Use करते हैं। Design Tab एक बहुत Important Tab है जिसके द्वारा हम अपनी Slide में अलग अलग तरह के Design डाल…
View On WordPress
#design ideas in powerpoint#design tab#design tab in powerpoint#design tab in powerpoint 2007#design tab in powerpoint 2007 in hindi#design tab in powerpoint 2010#design tab in powerpoint 2013#design tab in powerpoint 2016#design tab in powerpoint in hindi#design tab of powerpoint#microsoft powerpoint#ms powerpoint#ms powerpoint design tab#ms powerpoint design tab in hindi#ms powerpoint in hindi#powerpoint#powerpoint design#powerpoint design tab in hindi#powerpoint design tab tutorial#powerpoint in hindi#powerpoint kaise sikhe#powerpoint presentation#powerpoint tutorial#powerpoint tutorial in hindi
0 notes
Note
omg I need a full tutorial on how you do your edits on powerpoint because sis my edits trying to have even a little hint of *amazingness*
Hi! First of all your edits are beautiful and I am queuing them up 💛 and again, I'll never be as adept as the Photoshop gods, but since both you and @achalk asked, Powerpoint is surprisingly easy to use after some practice and is adequate to make edits, especially if you’re a beginner like me. I’m also still learning about color and fonts and other aesthetics.
A lot of it is trial and error, which is why I never look at my older edits cause they were definitely more on the error side, but I can break down some of my newer edits so you know what went on in there.
What usually takes a long time in edit making (especially graphics) is finding the right movie frames/pictures. The pictures I use are frames from movie files that are larger than 3gb. A truly marvellous place to find those files are in this post by @in-a-cave-with
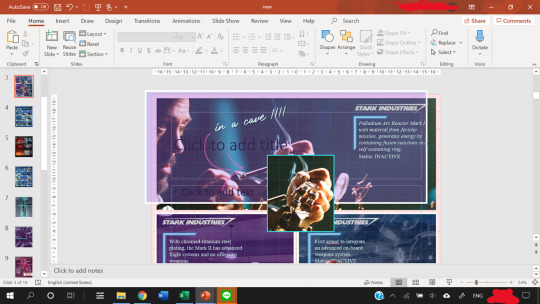
Figuring out how to arrange things is a balance between what picture you want to make and what the edit is about. for my last edit all the circular shapes was supposed to be like the arc reactor’s circle but that point might have been missed.
Anyway, I have no idea about your skills but under the cut we start with the very rudimentary basics and then I’ll dissect some of my edits for you. please excuse the messiness of my Powerpoints windows
The Basics
First of all, it depends on what version of Powerpoint you have. My university gives us free access to the Office 365, so that’s the version I’m working with.
I’m pretty sure a lot of the features I use most often (shapes, arranging, and animations) are available on all versions, though.
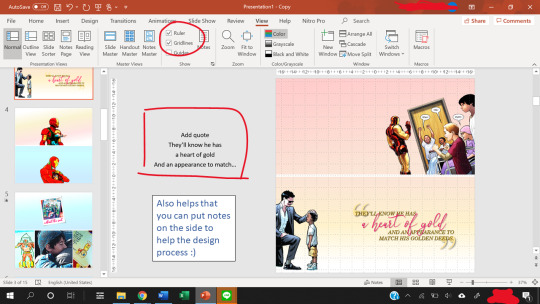
The gridlines are really helpful with positioning, and you can use the space beside the slides to add notes.
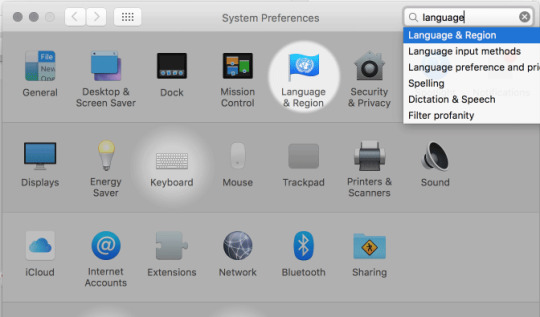
Also, to change the slide size, go to the Design -> Slide Size -> Custom Slide Size.
Usually, I use a width of 33.867 cm, which is the default for my Powerpoints and that translates nicely to 1280 pixels when you save as a PNG file.
The 1280 pixels is a multiple of 540 pixels, which is the width that tumblr rescales your images to, so it balances the quality of the image with tumblr’s determination to ruin that quality.
What I usually modify is the height of the slide, and that’s a balancing act. You want enough space to fit what you want, but not too much to crowd the dash. Nobody knows anymore what the maximum height limit is for tumblr but I try to keep the height below 60 cm for proportionality.
Note: each Powerpoint file can only have one slide size. So if you want to make one graphic but using two different slide sizes, you need two Powerpoint files.
Usually, I stick to one slide size per graphic so that it doesn’t confuse people.
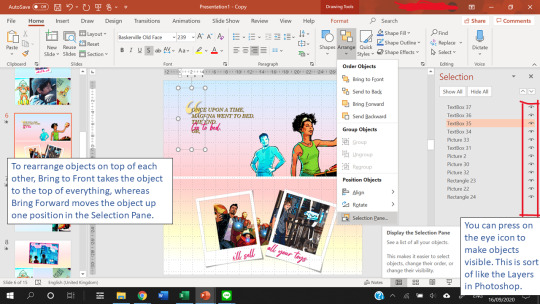
Finally, Arranging things is really useful. This allows you to have multiple “Layers” in your slide.
Creating Templates
Shapes in powerpoint are a beautiful thing. And the most useful thing is that you can fill a shape with a picture or with a gradient.
After you fill a shape with a picture, you can go to Format -> Crop. Then, you can resize that picture.
If you have the Draw tab in your Powerpoint, that’s also great for you to draw your own lines and shapes to give things a more authentic feel. You can find the Draw tab here if you have the right version of Powerpoint.
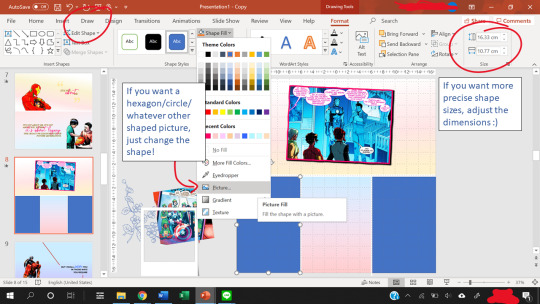
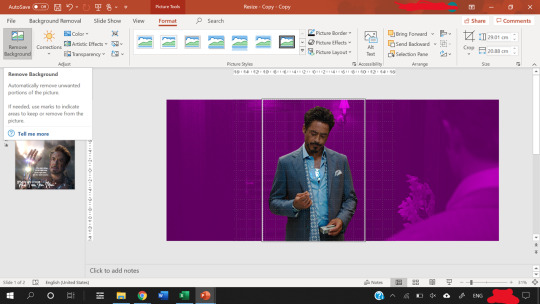
The Corrections option (see picture below, it’s the one with the sun icon) under the Format tab is great for quick adjustments to the brightness and contrast of a picture, and for saturation or grayscale adjustments you go to Color right next to it.
Artistic effects are useful to blur a picture, and if you want to adjust even further, you can go to Options at the very bottom of the pop-up which brings up a side panel for you to fine tune everything.
Notice that on the left of Corrections there is Remove Background. This is very useful as long as your picture has a clear background and foreground.

Shapes can also create a “template” for when you have more than ten images (which is the tumblr limit). You can put two images into one slide easily using the shape as a template so that the images are of the same size.
Gradients are nice to add some vibrance to your edits, and Powerpoint lets you adjust the angle of the gradients for variation.
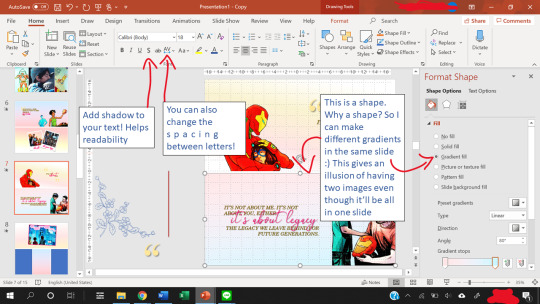
Other useful features include the text shadow effect and the spacing of letters.
To see how you can use shapes as templates, let’s look at some of my edits.
Anatomy of a Slide I

Let’s break this graphic edit down from my Tony Stark + Combat History edit. It has 12 parallelograms, 12 rectangles, 10 icons, 10 textboxes, 3 lines, and a texture background.
This is what the slide looks like as I put the first picture in.
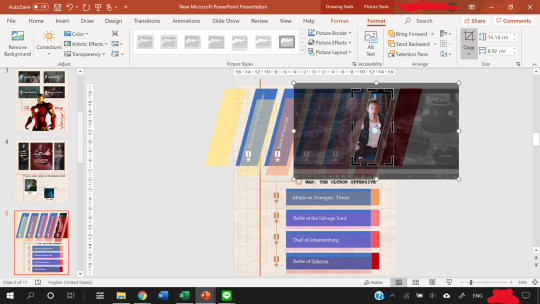
In the end result, the slide consists of:
5 parallelograms filled with a picture.
2 parallelograms at the sides are just filled with color.
5 more parallelograms are arranged on top of the 5 earlier parallelograms, and filled with a color. The transparency of the shape is adjusted so that it creates a sort of color filter for the pictures.
4 of the rectangles are filled with a picture.
4 rectangles are put on top of them, filled with color, transparency adjusted to again create a color filter.
Then, the 4 smaller rectangles at the end of the large rectangles are just filled with color. They are there simply for aesthetics :)
The 10 icons are the medals and the wreath. To find icons in Powerpoint, you can go to Insert -> Icons. Icons is right next to Shapes for me. You can change the color and transparency of Icons too!
The three lines are just to make everything look a tiny bit more cohesive and linked.
The texture background is a paper texture. To find texture backgrounds, there’s this really amazing resource post!
After the slide is done, you can save your slide as a PNG image (save as PNG and not as JPEG because JPEG is lossy and tumblr destroys it) by going to Save As -> PNG. You can choose to save one slide only or all the slides.
That’s it. You’re done making a graphic edit :)
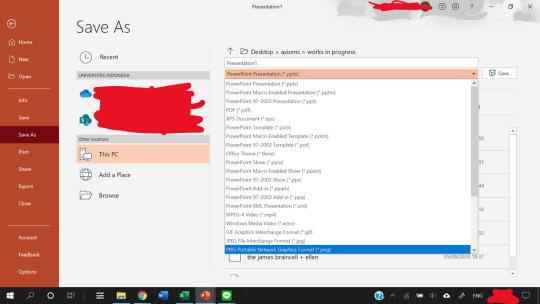
Notice that one of the save options is save as a GIF. That does not work unless you have the newest version of Powerpoint. I don’t have it, so in order to create GIFs, we need to find a workaround, which I explain next.
Anatomy of a Slide II

This GIF from my Tony + Ethics edit has 8 components/objects in it.
A black and white picture (a screenshot of Tony, cropped in Powerpoint and also turned black and white by adjusting the Color and Saturation in Powerpoint)
The color cutout of Tony.
Two lines (called Straight Connectors in the animation pane)
Four textboxes.
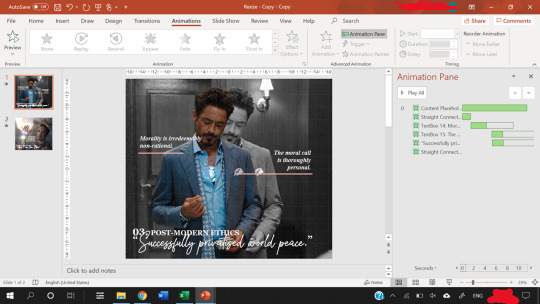
In order to make them appear one by one, animations are used. Here, all of them are animated using the Fade animation.
When you animate, make sure that the first object on the animation pane starts With Previous.
In the picture above, you can see that beside the first object in my Animation pane (the object called Content Placeholder) there’s a number 0. That means the animation starts With Previous.
Never set an animation to start On Click because then the animation won’t show up when you convert the Powerpoint to a video.
You can start an animation After Previous as long as the first animation is starts With Previous. Just never use On Click
To figure out what I mean by On Click, With Previous, and After Previous, you can check this link.
The objects with animations are the color cutout, the two lines, and three textboxes.
The color cutout is actually part of the original screenshot of Tony. I copied the screenshot, changed the saturation and brightness of it, and then removed the background using the Background Removal tool in Powerpoint.
For how to use the Background Removal tool, check this link.
Then, the color cutout is arranged to be in front of the black and white picture, and a Fade animation is put in place so that it looks as if only Tony is coming into color.
Similar animations are used for the textboxes and the straight lines. In order to animate by letter, follow this tutorial.
P.S. you can use emphasis animations to animate the color of a text.
Adjust the animation pane for the timing of the appearances, and present the slide to see if you’re satisfied with the final result.
The next step is how to convert the animated slide into an actual gif.
First, go again to Save As, but this time choose MPEG-4 Video (*.mp4).
Then, you extract each frame of the resulting video and then use photoshop to turn the frames into a GIF.
For a tutorial on how to make gifs in photoshop, check out this really amazing and blessed tutorial by @robertdowneys
Anatomy of a Slide III
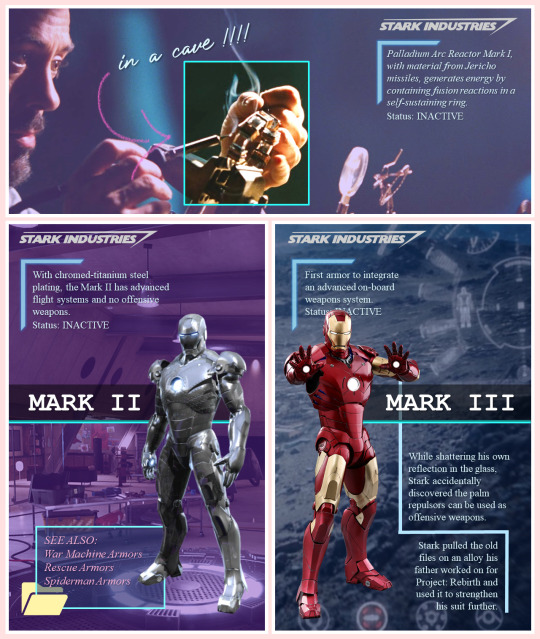
The top part of this slide has 8 components/objects to it:
3 rectangles
1 hooked shape
2 textboxes
The Stark Industries logo
The arrow
The hooked shape has a small glow effect added to the shape. Here’s a tutorial on shape effects. On that note, you can also make transparent text using various shape functions, and a tutorial for that is here.
The logo is a transparent logo downloaded from the internet, and the arrow is hand-drawn by me using the Draw tool in Powerpoint.
2 of the rectangles are filled in with the same picture and stacked on top of each other.
Then, the top rectangle is cropped to only Tony’s hand, and a border is added.
After that, another rectangle is arranged between the top and bottom rectangles. This third rectangle is filled in with a purplish color and transparency adjusted.
That creates a “highlight” effect for the part of the picture where Tony is working on the arc reactor. This same trick is what I used to make several parts of my ethics edits, like this GIF which I like.

Except, this time I make a circle shape first, fill that circle with the same image as the background, and adjust the size of the image to be the same as the background using the Crop tool on the circle.
Then, I make the background darker and the circle brighter using the Corrections tool. This increases the contrast between the two to create a highlighting effect.
Add a border to the circle, and add a Fade in animation.
Save the Powerpoint as a video, and turn video into GIF in photoshop.
Anatomy of a Slide IV - Inserting GIFs
Finally, you can put gifs into a slide! This GIF is from my Tony + his heart of gold edit. Make the GIF in photoshop, then just copy and paste the GIF into the slide like any other picture.
You can rotate, crop and adjust the size of a GIF in powerpoint.
You can’t make any other adjustments (e.g. you cannot change the brightness of a GIFor the color. If you try to do that, the GIF will freeze and become a still image.)
The GIF will not play unless you present the slide.
Don’t steal GIFs :) Again go back to that blessed tutorial on how to make your own GIFs, or ask permission from GIF creators.
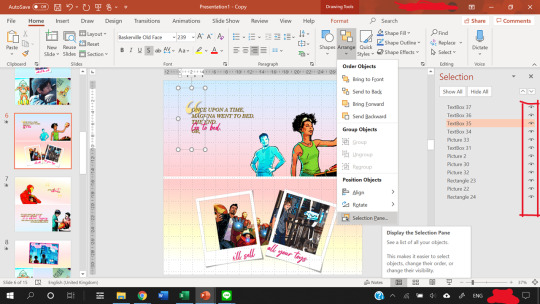
As you can see from the selection pane, this slide has 12 components.
The quotation mark is in a textbox of its own
3 textboxes with pink text (animated using a Fade in animation by letter), and 1 with the all caps text
2 polaroid frames arranged on top of a comic book panel (with background removed) and a GIF of Harley.
Plus, a comic book panel of Riri with background removed
Then there are two rectangles filled with a gradient color to serve as the “background” of the slide.
I made the bottom background rectangle a gradient that fades into white to make a more seamless transition to the next image.
You can see the GIF of Harley does not move in this view. However, when you present the slide, it will move. To check if you accidentally froze the GIF while editing, present the slide.
When you are satisfied with how the slide looks, again save it as an MPEG-4 Video (*.mp4). Then, you extract each frame of the resulting video and then use photoshop to turn the frames into a GIF.
That’s it!
Powerpoint has all those tools, and you shouldn’t be afraid to experiment :)
My foray into making edits was literally me, bored in class, with a presentation about data when I went... hey... that’d be nice if I put Tony’s face in it because isn’t everything better with Tony in it?
There’re even more useful features in Powerpoint but this tutorial’s gotten really long already, so I’ll leave it at that. Hope it helped!
You can send me another ask or message me if you’re confused :)
#asks#vormirjumper#resources#tutorials#i know you make beaufitul gifs but i included the gif tutorials in case achalk needs them!#this got WAY longer than expected#but i hope it's useful#forgive my ramblings#and i hope to see more of your edits because all that coloring!#and those captions of yours?? iconic
30 notes
·
View notes
Note
How did you learn to make the Goodnotes sets? I've been wanting to make my own with my digital art for personal use and I've searched the internet but I cant find anyone who will say how to make tabs etc. do you have any tips?
tbh I learned it all myself because no one had tutorials and youtube is useless for this as well as the fact that people gate keep for some reason. but I basically can say design is design and you need to plan on your own how you want it to look but
I use powerpoint. basically use shapes and then link them to their own slides. that’s the key information I struggled to figure out and then I went crazy and just came up with designs. tbh it’s all about shaping and then linking. I use powerpoint and photoshop for this religiously.
17 notes
·
View notes
Text
Powerpoint 2016 For Mac

Download Microsoft PowerPoint 2016. Create or view PowerPoint presentations with this up-to-date version of the popular software package.
Powerpoint 2016 For Mac Tutorial
Powerpoint For Mac 2011

PowerPoint is top-drawer presentation software, and the 2016 Mac edition gains a handful of useful additions to keep the tool vital. Borrowed ribbon: The 2016 Mac edition appropriates the. Microsoft Office 365 2019 (subscription) and PowerPoint 2016 (software installation only) are compatible with Windows 10 or macOS. The 32bit version is automatically installed but users can manually choose the 64bit download. Is there a better alternative? Google Slides and Apple Keynote are the two biggest competitors to Microsoft PowerPoint.
Microsoft PowerPoint was originally designed for creating slide presentations, not posters. But it can also be used to create a poster. When you create a poster with PowerPoint, you are creating the poster on only ONE slide (a very large slide).
NOTE: PowerPoint for Macintosh versions 2016 and 2011 are very similar. This section describes both. Screenshots from the 2011 version may differ slightly from the 2016 version but the features work the same way.
PowerPoint 2016 includes a few new features. Features unique to 2016 are identified below by the highlighted text New for 2016.
The following are steps and techniques to get you started creating your poster in PowerPoint.
Getting Started
Click on the PowerPoint icon in the dock, or double-click on the 'Microsoft Powerpoint.app' in the Applications folder on your Macintosh. The 'Powerpoint Presentation Gallery' appears. In most cases (unless you have previously created a template you want to use), choose to create a new presentation with a white background by clicking the 'White' thumbnail in the list of themes.
Or if you are editing a presentation you previously created you can click on its name in the 'Recent Presentations' at the bottom of the left-hand column of the window.
Alternatively, you can click 'Cancel' and a new, blank presentation will appear. Or you can go to the File menu and choose 'New Presentation' or 'Open...'.
.
A new PowerPoint document appears. By default, it shows text entry boxes for a title slide.
Above the document window, a formatting toolbar or 'ribbon' appears. Above the toolbar is a row of tabs (Home, Themes, Tables, Charts, etc.)
Set up your page and work area
Click the Home tab. Then click on the Slides Layout drop-down menu and then click on the 'Blank' thumbnail. This will remove the 'Title' and 'Subtitle' text boxes on the slide, with you probably don't need to use. (You can also delete them by selecting them (click and drag over the them with the mouse cursor) and pressing the delete key.
Next set your poster size by clicking on the Themes tab, then click on 'Page Setup' Slide Size' and choose 'Page Setup...'.
Powerpoint 2016 For Mac Tutorial
In the Page Setup dialog, enter the dimensions of your poster.
NOTE: PowerPoint will only accept sizes up to 56 X 56 inches. If your poster is larger than that, create the poster at half size. Then when you print it, print at 200%. For example, if you set the size at 20' X 40' and print the poster at 200%, it will end up being 40' X 80'.
If you are not currently connected to a large format printer, the following dialog box may appear. Click OK if you know you will be printing it on large format printer that can print at your desired size.
To make your workspace less cluttered, you may want to remove the slide thumbnails and a notes panes from your document window. You can do this by dragging the handles on the edges of these areas to the left and to the bottom, as shown below.
Powerpoint For Mac 2011
Here is the way the work area looks without the thumbnails and notes window panes:
1 note
·
View note
Text
Microsoft Publisher Business Report Templates

Create a one-sided business card Click File New and choose Built-in to use one of the templates installed in Publisher. In the Business Cards catalog, under Installed Templates, click the design that you want.
The Best Source for Microsoft Word Templates (With Unlimited Use) Envato Elements is the perfect place to find professional Microsoft Word report templates. For a low monthly fee, you'll have access to unlimited downloads of Microsoft Word templates. Get business, themes, photos, videos, fonts, and other resources to use in your business projects.
When you open Publisher, you'll see a catalog of templates to choose from. To create a publication, select a template that is most like what you want your publication to be. After you open the template, you can change it to include all the elements—such as colors, fonts, graphics—that you want.
Microsoft Publisher Web Page Template
Microsoft Publisher Templates Business Cards
Microsoft Publisher Business Report Templates Microsoft
Microsoft Publisher Business Report Templates Word
Click File New and choose Built-in to use one of the templates installed in Publisher. In the Business Cards catalog, under Installed Templates, click the design that you want. Note: If you know that you will be printing on a specific manufacturer's product, scroll to the specific manufacturer's section, and click the product that you will be using. Microsoft’s Publisher is a program specifically designed to create publishing worthy documents. It focuses more on the design and looks of the document than the content. MS Publisher Microsoft templates are the skeleton format for different types of documents. They are available in different designs that a user can download from Office Online.
In this day of DIY’ers, everyone is tech savvy enough to create and publish their own digital content, and computer software giants like Microsoft have programs that make it easy to do so.
You may have your basic applications that cover text documents (Microsoft Word), numerical data (Microsoft Excel) and presentation content (Microsoft PowerPoint).
For professional print publications, there’s Microsoft Publisher.
The application provides you with affordable and easy-to-use desktop publishing features that anyone can use. Because of this, it’s a great option for small businesses, everyday users, educators, parents or freelancers who need to design publications, but don’t have graphic design backgrounds. The application allows them to create branding and sales material that look professional.
Below we’ll give you a better idea of the application, what it does, how to work with it, and some resources to get you started.
What Is Microsoft Publisher Used For?
Microsoft Publisher lets you work as easily as you do in Microsoft Word, but instead of using tools for text, you’ll be using tools for editing page layouts and visual content.
Having said that, you may be wondering, what are the things you can do in Microsoft Publisher?
The answer: almost anything you need to professionally design and publish your material. Some examples include:
Personalized birthday cards
Event posters
Newsletters for small businesses and organizations
Professional business cards
Flyers and programs
Postcards and brochures
Of course, that’s just the tip of the iceberg. Editing and customizing that content is where MS Publisher really shines. You can work from scratch, from templates, or from existing content you may already have.
How To Convert PDF to PUB?
The beauty of the latter is that if you have legacy content in the PDF format which you need to use or update, you can convert PDF to PUB with Able2Extract PDF converter first.
Here’s how:
Open your PDF in Able2Extract.
Select the content you wish to convert.
Click on the Convert to Publisher command on the toolbar.
Save your new .pub file to your computer.
Microsoft Publisher Templates
On top of helping you work with your original PDF content, Microsoft Publisher also comes equipped with hundreds of premade layouts and cookie cutter templates you can use for guidance, ideas or inspiration.
To use a template in MS Publisher:
Click on File > New.
Then, you can either:
Select one of the Featured templates, and click Create.
Choose Built-in and scroll to select a category and choose a template, and click on Create to use it.
Use the Search functionality for online templates to find the kind of template that you need.
Once the template is open in Publisher, you can start formatting and editing it.
Getting Started With Microsoft Publisher
Before you start getting your hands dirty, there are a few basics you need to know. Because MS Publisher deals with all kinds of layouts, objects, formats and content, it doesn’t work exactly like you’re used to in MS Word. Below is a quick guide on how to go about the basic stuff.
Working with Objects
You’ll notice that in Publisher, everything will be formatted into movable “boxes”. These are known as objects, and are outlined with a border with four white circles and four white squares.
This may seem weird at first, but these frame-like boxes allow you to group, edit, manipulate and move content around on the page more easily. Here are some ways you’ll be working with objects frequently:
Adding text – To add text to your project, you work within the text boxes and can edit the text within the object directly. You can also add your own by going to the Insert tab and clicking on the Draw Text Box command, which lets you click and drag to create your own text object where you want it.
Most of the templates in Publisher will offer up pre-made boxes and objects, so getting familiar with these is necessary.
These boxes usually contain dummy text which you can easily double click and edit, customizing the font, size, and color.
Adding pictures – Adding pictures to your content is as easy as clicking on Home > Pictures. You’ll have options to insert pictures from a file, OneDrive or from a search on Bing. In addition, you have a number of options to format your picture in your publication.
Microsoft Publisher Web Page Template

Just head over to the Format tab when your picture is selected and you can start tailoring your images. To learn more about working with images, you can read Microsoft’s tips on working with images in Microsoft Publisher.
Using Building Blocks
Building blocks make it easier for you to build and customize your publication by giving you pre-made elements. You can find these under the Insert tab on the ribbon:
By exploring a few customizations, you can easily select an element you want and then click and drag to reposition and resize the element accordingly. It’s an easy way to apply and manipulate reusable pieces of content.
Microsoft Publisher Templates Business Cards
You’ll find this coming in handy when you want to add headings, borders, sections, accents, and advertisements. Microsoft Publisher has these building blocks built right in, but you can also create your own.
Using the Design Checker in Publisher
This is another feature you’ll want to use when you’re done putting your publication content together. The Design Checker is accessible via File>Info>Design Checker. It’s a tool that reviews your final content for layout or design problems and it appears on the right hand side of the interface.
Think of this tool like your everyday spell checker, but for your publication content instead of textual typos.
The Design Checker reviews your content for a variety of design and layout problems, allowing you to catch and fix them before you finalize a print job.
And don’t worry if you aren’t a designer, the tool will provide you with explanations and suggestions on how to fix the problems it detects.
You can also specify the types of problems the tool will look for by clicking on the Design Checker Options dialog box.
Printing up your Project
As an application geared towards creating digital content meant to be printed up, this will be another basic task you’ll need to be familiar with. To print up your project, Microsoft Publisher has a few methods to help print your content.
There’s the standard method that uses the Printer functionality which you’re familiar with if you’re printing a publication on your desktop printer. The only thing you’ll need to do is ensure that you have the settings adjusted to print your content correctly on the size and type of paper you need. Do remember to save your project first, though, before you print!
In addition to your usual PDF and common file types, there is also the Pack and Go Wizard via File>Export>Pack and Go.
This method will give you options on how to save your file for different printing purposes – even for a commercial printer – so you don’t have to worry about the technical details of formatting and settings. The Wizard will do that for you. You simply decide which option is best for your needs:
Knowing how to work your way around with the above basics will let you work easily with any type of layout or project you’re working on.
Microsoft Publisher Tutorials
Now that you know a bit more about how Microsoft Publisher works, it’s time to try your hand at it. In addition to some templates, we collected a few Microsoft Publisher tutorials to help you quickly get started:
So, armed with the basics, you’re now ready to start creating professional looking content for publishing without the hefty price tag.
Let us know in the comments what other questions you have for working with your digital content and how MS Publisher worked for you.
Back to Business Card Templates Microsoft Publisher
98 Report Business Card Templates Microsoft Publisher Now with Business Card Templates Microsoft Publisher
You can Download 98 Report Business Card Templates Microsoft Publisher Now with Business Card Templates Microsoft Publisher full size click the link download below
Just click download link in many Resolutions at the end of this sentence and you will be redirected on direct image file, and then you must right click on image and select 'Save image as'. 220 × 165/1280 × 720
We hope you can find what you need here. We always effort to show a picture with HD resolution or at least with perfect images. 98 Report Business Card Templates Microsoft Publisher Now with Business Card Templates Microsoft Publisher can be beneficial inspiration for those who seek an image according specific categories, you can find it in this site. Finally all pictures we have been displayed in this site will inspire you all. Thank you for visiting.
This image is provided only for personal use. If you found any images copyrighted to yours, please contact us and we will remove it. We don't intend to display any copyright protected images.
Microsoft Publisher Business Report Templates Microsoft
Random Images
Microsoft Publisher Business Report Templates Word
☐ 287 views
1 note
·
View note
Video
youtube
How to Crop an Image Into a Perfect Circle in Microsoft PowerPoint | Eas...
Want to give your images a polished, circular look in your presentation? In this quick tutorial, you'll learn how to crop any image into a perfect circle using Microsoft PowerPoint. It's simple, clean, and perfect for profile photos, design elements, or professional presentations. 🎯 Follow along step-by-step to enhance your slides with custom-shaped images!
Simple Steps 1. Open your project in Microsoft PowerPoint 2. Click on your Image to select it. 3. Click on the "Picture Format" tab. 4. On the right side of the ribbon click on the arrow below "Crop". 5. Place your cursor over "Crop To Shape" and then select the "Oval" shape. 6. Make sure your image is still selected and you are on the "Picture Format" tab. 7. On the ribbon, click on "Crop" and place your cursor over "Aspect Ratio" and choose 1:1.
0 notes
Text
How to draw a fantasy or alien creature
Here’s an easy way to draw some special creatures and that’ll still look good even if you got zero drawing talent.
To illustrate the guide a little, I’ll be adding notes, thoughts and process pictures of an example I did. (I apologize for the suboptimal quality of my camera in advance)
You'll need:
a piece of paper
pencil
eraser
optional: coloured pencils (or water colors, felt pens etc)
a computer / iPad etc. (a mobile phone works too but it gets small)
Or if you don’t have a computer or so or the pictures you want (See step 3) are already printed. However, I do recommend to use digital pics because they hold many advantages.
printed pictures of the components
a window or light source
-
Step 1:
The Basic design of your animal
Think about the basic body-form: Shall it be long, round, tall etc. ? Or use looks of other animals as reference. Decide what perspective you will draw it from. (from the side or the front? Or maybe from above?)
Try to come up with a few features about its habitat: Is it hot or cold, dry or wet, or in mountains? Maybe it lives in the air or underwater. This’ll help you with the colors or the skin texture later on or even has influences on the body-form.
Even humanoid aliens are possible with that guide, just use a human as the main reference, then change parts to make them look different. (Though I never tried that before yet)
My animal
It shall be a predator-species called Orinthio that lives in a tropical area. It’s a rather bulky animal and I’ll draw it from the side. Although in my case I mostly want to draw the creatures because I inculded them in a story, so the habitat and maybe a rough description was already given. (Not for the Ornthio though, I invented that for the tutorial, which was a mistake because I did not prepare everything as carefully as I usually do when introducing a new animal.)
-
Step 2
Divide it into sections
Split your animal into different body parts such as: head, legs or arms, main-body, extras (wings, tail, horns, hairs etc.). Of course you won’t need all the parts for each animal but these are just ideas. Also think of details such as: eyes, ears, hairs, fur, spikes, feet, hands, fingers, claws, tip of tail, teeth etc.)
Then collect ideas for what the parts you defined could look like. Search an object or existing animal as reference.
But in all your creativity, pay some attention to physical "rules" (Like tiny, thin bird legs for an elephant shaped animal? Or a thickly furred, black panther for a desert? Better not)
The parts for my Orinthio will be:
head -> shall look like a rhino’s
horn -> will look like a croissant
main body -> shall be the one of a horse
legs -> like a crab
tail -> shall be a baseball bat
tail tip -> is a spade (from the cards)
-
Step 3
Find the pictures
Now you’ll need to search pictures of your objects of reference. Try to pay attention to perspective, chose such that make ‘sense’ with the rest of your drawing. Don’t just take the first picture you see coming up in Google images. Do some research and also try other animals or objects that look similar. Often you’ll find an even better solution
Of course these pictures don’t need to be the definite ones, maybe you’ll want to change the head after you drew the main body. And you don’t need to find images for all details. Like you can just draw the eye or teeth by hand if you want… But it can’t hurt to search for some reference.
My tip is to leave the Browser tabs (one tab per picture / body part) open and copy the images into a Word file (or PowerPoint or another design programme if you have one). Because if you got them in a file, you can easily move, crop, flip, transform, scale or spin them.
Attention here to copyright. If you just draw the animal for yourself or to show it to friends it doesn’t matter what you take. As soon as you want to share it on the internet or even make money with it, you should read more about it to be on the safe side…
My pictures
I’ve cropped, transformed and put them into an order that they kinda already form the animal in a way, as you can see. Doesn’t look to bad, eh?

-
Step 4
Trace the contours
That works best by attaching the piece of paper to the screen (eg. with a post-it tape or “normal” tape that you put onto your clothes first that it doesn’t stick to the screen forever. Or adjust your laptop / monitor that the screen is flat on the table and facing up (but don’t break it!).
Then start tracing the contours. (Or if you’re good at copying, do that if you want) It doesn’t need to be perfect, especially at places where it it’ll connect to other body parts. It doesn’t matter with which body part you start, but I prefer starting with the main body because it’s mostly the center.
Once you’re happy with the part, take care of the next one. You might need to edit the picture a little bit that it fits better. You don’t always need to remove the paper from the screen, unless you want to have a look at it. Also make sure the “connection” to the other part is smooth, feel free to retrace a few lines if you have to. (Like remove the paper from the screen altogether)
Now just draw all the parts until you’re done.
Tips: if it’s hard to see the contours of the picture you chose, increase the screen’s brightness or the pictures contrasts, whatever fits best in the situation. And Protip: hide the pics that you’re not working with at the moment to not get distracted by them (Yes, you can do that in MS Word or PowerPoint! Here’s how to do it )

Tracing the main body of my animal

Connecting the head to it (as you might can see I had to move / scale the pic a little before I could draw)

For the legs i just flipped, scaled and moved the crab’s legs. Thankfully I chose a pic with more than one example.
-
Step 5
Edit your animal
Remove the paper from the screen and have a look at it. You’ll find places where you need to correct some lines to make it look smoother, or maybe you need to change a few proportions a little (Eg making legs a bit thicker)
In this step you should also add the other details you didn’t bother getting pictures for. Sometimes I notice that suddenly something doesn’t look good anymore, so I need to change a whole arm or so.

My first look at my Orinthio after I removed the paper from the screen. There’s a lot that I want to correct. E.g. the nape pf his neck, the tail and erease some lines. (Note: I’ve just learnt that solid and hard objects don’t make good tails... you’ll also find out your own ‘rules’ after drawing a couple of those)

And here the edited version. Looks smoother, doesn’t it?
-
Step 6
Unleash your fantasy
This step is optional but highly recommended. Give your animal some finishing touches.
Like trace the outer line with a pen. Add more details or give it a skin structure (fur, scales etc). Add colours! (Tip for that: use layers, like start with the brightest colour, then draw over it with a darker shade and so on. You can also add shadows like this. In the end, it often helps to ‘blend’ the colours by adding another layer with the brightest colour. Or watch some tutorials about drawing)
You can also give it a background or draw objects of size reference next to it (eg a small human to show the dimensions. Or a huge apple if your animal is tiny)
Or you can name the species (or the individual) and write it down as well.
And done! Here’s your fantastic beast. Feel free to send me pics or tag me in posts if you chose to share an example

The first layer of color. Of course, it could arleady be left like that.

But if you have a little more patience it’ll look more realistic. I chose not to draw a background because I wanted the focus to be on the animal :) But there are no limits to your creativity
#fantasy#fantastic beasts#this is fantastic#fantasy creature#fantasy animal#animal#animal drawing#drawing#my drawing#drawing tutorial#how to draw#tutorial#my art#art tutorial#how to#alien#alien creature#step by step#cool drawing#creature#creature drawing#sketch#you can do it#easy drawing#design#guide#drawing guide#unleash your creativity#send me pics
10 notes
·
View notes
Text
How to Use Custom Templates Effectively
Business PPT Template Design: Q & A Tutorial
1. How are PPT used in business?
PPT, or PowerPoint presentations, are used in business to visually communicate ideas, strategies, and information during meetings or presentations. They help organize content, engage audiences with visuals, and facilitate discussions. PPTs are commonly employed for training sessions, sales pitches, project updates, and corporate communication to make complex information more understandable and memorable.
2. How to make a template in PPT?
To create a template in PowerPoint (PPT), open a new presentation and design your slide master by going to the "View" tab and selecting "Slide Master." Customize the layout, colors, fonts, and backgrounds as desired. Save your template by clicking "File," then "Save As," and choose "PowerPoint Template (*.potx)" as the file type.
3. How do I find templates for PPT?
You can find PowerPoint templates by searching online on websites like Microsoft Office Templates, SlideShare, Canva, or Template Monster. Additionally, you can explore the built-in templates in PowerPoint itself by opening the program and selecting "New." Many educational and business sites also offer free or paid templates that you can download and customize.
4. How to design a PPT in Canva?
To design a PPT in Canva, sign in or create an account. Select "Presentation" from the templates. Choose a pre-made template or start from scratch. Add slides, customize text, images, and colors using the toolbar. Use drag-and-drop features for easy arrangement. Once finished, download as a PPT or present directly from Canva.
5. How do I insert a PPT template?
To insert a PPT template, open PowerPoint and select "New" from the File menu. Choose "Templates" and browse for your desired template. Click on it and select "Create" to apply it to a new presentation. If you have a template file (.potx), open it directly or use "File" > "Open" to load it.

Visit: VS Website See: VS Portfolio
0 notes
Text
youtube
How To Hyperlink An Image To A Phone Number In Microsoft PowerPoint On Office 365
In this step-by-step tutorial, learn how to hyperlink an image to a phone number in Microsoft PowerPoint. Whether you're designing a presentation for business or personal use, linking an image to a phone number can make it easy for viewers to contact you directly with a single click. Follow along as we guide you through the simple process of adding clickable phone number links to your images in PowerPoint. Perfect for enhancing your presentations with interactive elements!
Simple Steps
Open your PowerPoint Presentation.
Click on the image to select it.
Click on the "Insert" tab.
Click on the "Link" tab.
Click on "Insert Link" from the dropdown.
In the dialog box that opens click on the "Existing File Or Web Page" tab.
Enter the phone number in the address bar using the tel://1234567890/ formula
Click On "OK".
0 notes
Text
Free Pdf To Word Converters For Mac

How To Convert A Pdf To Word Document Mac Free
Convert Pdf To Word Free Software Mac
Oct 15,2019 • Filed to: Mac Tutorials
The PDF Converter free version is an easy-to-use tool that allows a PDF document to be converted to a fully editable PowerPoint Mac 2008/2011 pptx presentation- preserving the original layout of. This free online PDF to DOC converter allows you to save a PDF file as an editable document in Microsoft Word DOC format, ensuring better quality than many other converters. Click the UPLOAD FILES button and select up to 20 PDF files you wish to convert. Wait for the conversion process to finish. Top 5 PDF to Word Converter for Mac 1. PDFelement is widely used by professionals in multiple industries such as architects, designers, writers, developers, HR executives, accountants, and many more. In fact, PDFelement is useful for any scenario where documents are processed and PDF is the primary vehicle to disseminate written information.
When it comes to change PDF to Word format, users might search from the internet and try to convert PDF to Word online. If so, you might get bad result and take risk on your file itself. The online PDF to Word converter tool might produce low quality output, have limitations on file size, what even worse is that it cannot protect your file security. If you want a fast, secure and productive way to convert PDF to Word on Mac (macOS 10.15 Catalina), just read on to get the answer.
Method 1. The Easiest and Professional Way to Convert PDF to Word on Mac
PDFelement Pro - The Best Way to Save PDF to Word Document
PDFelement Pro is an all-in-one PDF editor and converter. It can help you convert PDF to Word and many other file formats without losing the original layout. The built-in OCR feature enables you to convert scanned PDF to Word and other format without hassle. And you can convert multiple PDF files to Word at high speed.
Why Choose This PDF to Word Converter:
Convert PDF to Word, Excel, PPT, EPUB, RTF, and images format with original format.
Batch convert PDF files into Word and other format in high speed.
You can convert scanned PDF with the advanced OCR feature.
You can easily modify texts, images and pages in a PDF.
Easily markup PDF and annotate PDF with sticky note and hand-drawing shapes.
If you want to create PDF from other types of file, you can also rely on this smart tool.
Its secure function lets you to protect your PDF file with password, watermark or signature.
Easy Steps for Converting PDF to Word on Mac (10.15 Catalina included)
PDFelement Pro for Mac is fully compatible with Mac OS X 10.7 or later, including the latest macOS 10.13 High Sierra. There are more amazing features for you to explore. Below is a step-by-step guide for converting PDF to Word document on Mac computer. And you can also convert PDF to Excel and other formats. For Windows users, you can download PDFelement Pro to convert PDF to Word on Windows PC.
Step 1. Launch PDFelement Pro for Mac
After you've downloaded and installed this Mac PDF to Word converter, launch it. On the primary window, choose 'Convert PDF' from the menu to open the PDF convertion window.
Step 2. Transfer PDF to Word
Click the 'Convert' menu and select the output format as 'To Word'.Finally, click 'Convert' to turn PDF into Word. You can also customize the page range and add more files for PDF to Word conversion.
Step 3. Convert Scanned PDF to Word
If you file is image-based scanned PDF, you can turn on 'OCR' feature under the 'Edit' tap. And then click 'Convert' to change scanned PDF into Word format.
Step 4. Edit PDF before Converting (Optional)
If you want to make some changes on your PDF before converting it into Word document, you can click 'Open File' on the primary window to import your PDF. Then click 'Edit' button on the top toolbar to modify the texts and images in the PDF. To edit pages, you can choose the corresponding options 'Pages' .
If you'd like to annotate your PDF, you can click the 'Comment' button and get options for adding sticky note, text box, drawing lines/shapes and highlight. Finally click 'Save' to confirm your changes.
Method 2. Save PDF as Word Document on Mac Using iSkysoft PDF Converter for Mac
To simply convert PDF into Word on Mac, I recommend iSkysoft PDF Converter Pro for Mac, which is a simple PDF to Word Converter Mac (10.15 Catalina included) program for someone who is facing the problem of converting PDF files to formats like Word, Excel, PPT, Text, and more for better editing, saving, etc.
Why Choose This Mac PDF to Word Converter:
This Mac PDF to Word converter can convert standard and encrypted PDF files to Word (.doc and .docx).
It can convert PDF to Word and other formats without losing the original style and format.
And you can use it to do batch conversion or convert only specified PDF pages.
It comes with OCR technology which saves image-based scanned PDF to Word and other formats.
Steps to Get PDF to Word on Mac
Step 1. Run the Program and Load PDF Files
Open this Mac PDF to Word application from 'Application' folder after you have installed it. And import the PDF files you want to convert to Word format. You may drag and drop one or several PDF files to the interface of the program. Alternatively, you can go to 'File > Add PDF Files' to select the PDF files and import them to the program.
Note: You may import up to 200 PDF files to the program. If you want to add or replace some text, and make some other editing before the conversion, you can go to the guides on how to extract image from PDF, delete page from PDF, and so on. If you want to insert or modify some text before the conversion, you can follow the guide on how to edit PDF files on Mac.
Step 2. Choose the Page Range and Output Format
Click on the PDF file to highlight it, and you will see a gear icon show up. Click on the 'Gear' icon to open the output settings window. In the 'Page Range' column, you can customize the pages you want. You may specify the Page Range to convert partial PDF pages to Word pages. And then choose 'Word' format as the output format prior to convert PDF on your iMac or Macbook.
Step 3. Start to Extract PDF to Word
Click the 'Convert' button to start the conversion. When it is done, you'll get a message. Click 'OK' to open it with Microsoft Word (if available) to make sure everything is converted correctly.
Method 3: How to Convert PDF to Word on Mac Using Automator
How To Convert A Pdf To Word Document Mac Free
First, you need to know that Automator is actually part of Mac OS X. Below are the simple steps that one follows in order to convert their PDF files to editable word document on MAC using Automator.
Step 1. Open the Application folder on your Mac gadget and double click the tiny silver robot icon to launch Automator. Then a dialogue window appears that requires that you make a work flow.
Step 2. Just below the action menu, on the first column; locate and click the 'Files and Folders' button. You are then required to click and drag 'Ask For Finder Items' from the second column and drop it to the workflow segment situated at the right-hand side of the window.
Step 3. You will then refer back to the first column and click on the 'PDFs' button. From the second column, this time you will drag 'Extract PDF Text' and drop it under 'Ask For Finder Items' on the workflow panel. On this process you will be able to see some options that you can set. For a converted text file that retains its original text formatting, you will choose the 'Rich Text' option.
Step 4. Finally save your work flow. Press Command – S and then provide a suitable name then click on the save button to conclude this process.
Step 5. Now start using Automator through the workflow process you have created to convert your PDF files to word. It is as simple of just finding and selecting the PDF file that you need converted and let the Automator do the rest of the job for you.
Pros:
It is part of the Mac OS X, users can access its valuable services directly.
Cons:
It is messy – the rich text option only ensures that the converted file retains its original format of text and not the overall layout of the document.
Method 4: How to Convert PDF to Word on Mac Online
You can use some websites to convert PDF to Word. We will now discuss about how to turn PDF into Word using freepdfconvert. So let’s get started.
Step 1: The first thing is to visit the website of freepdfconvert.com. After entering into the website, you see the primary page like below.
Step 2: You see that there are many buttons like 'PDF Converter', PDF to Word' etc. As you have to convert PDF to Word, click on the 'PDF to Word' button.
Step 3: Now you see a button named 'Select File'. By tapping on the button, you can browse for the PDF file that you need to convert.
Step 4: Once you select the PDF file, hit the OK button of your browsing box. You see the PDF file named 'TriFold Coffe & Muffin….' has been uploaded to the website for further conversion. Now you will have to hit the 'Convert' tab for start converting. It will take some time depending on the file’s size to complete the conversion for PDF to Word.
Step 5: Once the conversion is complete, you will see a new button named 'Downlaod'. By tapping on the button, you can go for downloading, deleting or saving to Google Docs as per your wish. By downloading the file, you are getting a Word file of your PDF file.
PDF to Word Online Converter
You can also opt to convert PDF to word on Mac online by using other online tools, below are 3 of the most common online PDF to word converters.
1. ZamZar PDF to Word Converter
Convert Pdf To Word Free Software Mac
ZamZar is a online PDF to Word converter that can actually convert your PDF file to a number of other file formats like PPT, xlsx and many more. Just start by selecting the PDF file or URL of its location – > Choose the format – > Then key in your email address so that you can receive the converted version of the file – > finally click on convert button.
Pros:
No need to download.
Easy to use.
Cons:
It takes a long time for batch files, it can only convert one PDF file at a time.
It requires the user to have an email address.
2. Online PDF-Converter
This is among the best PDF to Word converter online service that anyone can use. It is quite popular generally because f its versatility and ease of use. When you open the online2pdf.com website, select the PDF files you need converted (up to 20 files), select the desired output format (Word), and finally click on the convert button.
Pros:
Allows up to a maximum of 20 PDF files.
It is easy to use as well as edit the PDF files.
Cons:
You can only access this resource online, basically you can never do much without the internet connection.
3. PDF to Word Converter
pdftowordconverter.net is such an excellent website to consider for your online PDF to word conversion needs. Quite an easy to use resource as compared to the ZamZar option, as it only includes two simple steps. First, you will have to choose the PDF file – >then hit the convert button, and download the converted file to your Mac device.
Pros:
Very easy to use.
It is no fee.
Cons:
It is quite slow as it can only covert a single PDF file at an instance.
Method 5: Turn PDF into Word Using Google Docs
You may have already known that Google Docs has the functionality of creating as well as editing Doc files. Now you will be amazed to know that with Google Docs, you can also convert PDF into Doc file. The good news is that the service of converting PDF into Word is totally free of cost. So you can expect a good service of PDF conversion from the internet giant Google with their Google Docs. Another good thing is that the Doc file that is created or converted by Google Docs is compatible with cross platforms, so you can use the converted file on Mac, Windows, and Linux etc. Not only that, popular mobile platform Android also supports the Doc format.
Now learn the process of Google Docs to convert PDF into Doc. You should know that you will not be able to convert as Word, but Doc is also considered as one type of Word document.
As it is totally free to convert, you only need an updated browser along with a Google account (@gmail.com).
Step 1: First of all, visit Google Docs and login. As you know that one Google account is applicable for all the Google’s products, so if you have a Gmail account, you can login with that for Google Docs.
Step 2: You will have to tap on the tiny upload icon that is located next to the button of 'CREATE'.
Step 3: Now from the browsing option, go for the PDF file that you would like to convert.
Step 4: After that, in the 'Upload Settings' panel, check the option named 'Convert text from uploaded PDF and image files' along with other two options.
Step 5: Now by choosing the 'File' option, go for the button 'Download as' where from you can download the PDF file as Doc file. This Doc file will be compatible for cross platforms.
Method 6: Turn PDF into Word Using Adobe Acrobat
Using Adobe Acrobat, you can convert PDF to Word too. Here are the processes that you will have to follow in order to achieve the conversion.
Step 1: Open a PDF file that you will convert Word.
Step 2: On the top menu bar, go for 'File' option.
Step 3: From the drop down menu, you will have to go for 'Save As Other…'.
Step 4: Then go to :Microsoft Word' and after that it will show Word Document.
Step 5: Pressing on 'Word Document', it will show you paths for saving the PDF file as Word. Set the path and press Ok. It will be saved as Word file.
iSkysoft PDF Creator - Convert Word to PDF on Mac with PDF Creator for Mac
iSkysoft PDF Creator for Mac is an easy-to-use yet quality Word to PDF converter. With it, you can convert unlimited Microsoft Office files including DOC, DOCX, XLS, XLSX, PPT, and PPTX to PDF. It comes with many wonderful features:
Key Features:
Convert Word, Excel, and PowerPoint to PDF easily and quickly.
Create high-quality PDF with high resolutions and 100% original formatting.
Import unlimited Word files and convert to PDFs at once.
0 Comment(s)
1 note
·
View note
Text
Top 10 best Statistical Analysis Software with price for 2020
Best Statistical Analysis Software
In this technological age, everyone in this universe uses a lot of software to make the job easier and faster. Just as you know that software makes the job easier, faster and more reliable, the software cannot be completely successful without business.
SAS is defined as a statistical analysis system or software. This SAS is used for simple or logical analysis of statistics. Statistical analysis software is used mainly for statistics and is used by most industrialists throughout their activities.
With this blog you'll surely learn about statistical analysis software, the amount of software, software capabilities, and more. On the other hand, you'll also know the price of each software that will help you choose a budget.
We'll give you the best tutorial for statistical analysis, but you'll need to learn or learn about SAS first. Let's start learning about it.
What is sas?
SAS, formerly called statistical analysis software, is a software package that performs many tasks such as business analytics, data management, forecast analysis, and advanced analytics. Enabled by the GI and SAS programming language, it allows users to perform tasks such as access to data in almost any format, including database files and SAS tables. You can also get SAS. You can also manage and manipulate existing data using this.
SAS is an analytical platform that allows you to manage data, store data, conduct business intelligence, predict, analyze text, conduct machine learning and visual analytics. It also has its own server and database. This allows companies to manage their data, create reports, create applications and BI models. Now it's also about machine learning and big data analytics and helping companies in all areas of data recovery.
This time, since it includes many programs that can perform many tasks and have many advantages in this area of statistics.
So all of this applies to SAS, since all the software is part of this SAS, so it's important to know about it. Now we'll tell you about the best software that's useful for SAS.
Top Most Statistical analysis softwares:
This minute's software provides a range of advanced and fairy numeric tools for analyzing data. Both scripted commands can be executed in this command and THE GI makes it accessible.
It helps to find the best regression eq by model reduction technique.
Minitab allows direct transfer of MS. Excel XLSX files to Minitab Express.
Price starts from $29 for six months and $49 for annually.
This tool does not require any programming, no coding, or typing to process data. Any professional wizard can easily start surveying or programming with the help of Mac. It has a simple GI To better understand the code structure and the predicted models make business preferences easier.
It can divine the outcomes from the one or more selected options.
Wizardmac gives you simple graphical results that help you to understand results effectively.
It makes particular predictions after generating predictive models by pop-up buttons and sliders.
You can use the Free trial version for some time. the price depends upon the package of software higher the package higher the price.
This tool is available for both Windows and other OS. Acastis is a statistical tool which is also available online and is very easy to use. It is much faster to work on this software than others. It easily adjusts the formats of labels, values, and controls that make it better. It also allows importing data from spreadsheets.
It is available for all OS and allows importing data from spreadsheets through copyand paste tools.
Formattes the asset value labels and variables or sets missing values and record variables.
It designs logistics regression, frequency table, OLS and descriptive figures.
Prices start at $9.99 and increase the facilities.
A large quantity of graphical and statistical data will be displayed on NCSS software. It also provides training online and you can arrange data in effective format. 24 * 7 email support features are available for users.
Easy to export and import data using data windows. Easy to achieve numeric results in a few steps with NCSS.
By filtering and editing, you can easily manage data.
You can easily select the best analysis process using the Pull and Drop option.
The final result obtained by NCSS can be used faster for further processing and is ready to see, cop, paste or preserve.
The annual charge is available from $239 and can be upgraded to $199 for more features.
For this software learning data, it is very easy to use a very vintage or very first tool or software in the category and easily available online. This software software code structure and features are very understandable and available at a reasonable price. Many steps are necessary to complete statistical analysis in single dialog b. You provide information about the empty project and maxstate will run and process the result equally by selecting the statistical tools related to the project. Maxstate is useful for both professionals and students.
It is very easy to understand and give results effectively. You can also learn the basics of statistics through the online tutorials and document through the online tutorials.
This tool helps non-professional statisticians by performing the operation easily as per the requirements. You only provide data and will automatically select the best tool.
It is very easy to understand the result of data. You do not need an expert to interpret the result in a scientific way.
The light version or licensed version of Maxstate costs professionals €79 for users and €39 for students. Additional facilities may increase costs.
Statwing is the perfect software to get the result quickly. The execution time is 5 times faster than the other tools. It comes with a simple interface with simple instructions which makes it easy for the execution of data. it also allows the new user to work on it.
Its simple interface enables new users to create insight from their data.
Statwing also takes into account outliers which allow analysts to be confident in their analysis/results.
It follows data structure in such a pleasant manner that it automatically generates different sets of charts such as histograms, scatterplots, bar charts, etc. which can be easily exported to PowerPoint or Excel spreadsheets.
You can use a 14 days free trail and after that upgraded by giving $25.
This software is the complete package needed to analyze the data. you just need a computer with great memory and software that allows you to create graphics without large amounts of data.
It provides many features of standard methods, such as tabs, and some advanced features such as tiered models.
There are also some advanced tools for processing functional data, such as survival data, time series data, etc.
This allows users to have complete control over the data. You can combine adjustable variables and compile data by group
The price starts at $179 a year. The free trial is also available online for users.
XLState comes with a package full of many features to meet the user's needs. Easy to use on both PCs and Macs. This software is connected to MS Excel to improve statistical tools.
More than 200 SAS users are ready to meet their demands.
Excel makes it easier to analyze data.
It provides you with testing, data mining, modeling, data testing, and faster implementation.
Starts at 5,275 per user per year. A free trial is also available.
The statistical package for social sciences is SPSS, which is widely used for data analysis in a statistical software package. It has the ability to easily collect parametric and non-parametric or descriptive statistics. It also has the option to create scenarios to automate analysis or perform more complex statistical processing.
Cloud Care has excellent features to identify models and courses in structured and unstructured data with a natural visual interface.
The quality of products and data is managed and maintained by asset analytics.
It has an easy-to-use interface. each user can analyze and deliver the expected results
It is available at an affordable price of $99 once per user.
This software has the world's best analytical and graphic allotment solutions and is designed for research. This helps you do a great job, simplify statistics, and describe your history with data.
There are countless ways to generate a graph in a good way.
You can easily reproduce your work by creating a template by duplicating a family or cloning a schedule, saving you hours to set up.
The main feature is that it exactly simplifies the fit curve, no other program will simplify it properly.
Prism's price will be $150 per year per user.
Conclusion:
This blog will help you to choose the best budgeted software for data analysis. Statistical analysis softwares has many species and all have different features. Similarly, data also have several species and different data choose different software according to their properties. So this Blog will find you out the best software. By this blog you also compare all the prices and features of different statistical analysis softwares which will be helpful for you while purchasing.
If you want Statistics Assignment Help and Statistics Homework Help or Do my Statistics Assignment. or SAS assignment help So, Our experts are available to provide you within a given deadline and definitely you will score good in your academics.
1 note
·
View note